
Again here with a cool blogger hack.You read earlier about adding Digg button to your post. So i thought how can i be so rude at reddit since both sites work similar and reddit also provides traffic as same as digg. So this post is dedicated about adding reddit button in your blog. If you are not familiar to reddit and not clear about its benefit for your blog then you can visit Reddit homepage.
Its not hard to add reddit button to your post so that the post can be added to reddit by the readers. Its just some alter of codes like adding digg button and you got it. Ok lets start, first goto Edit HTML section of your Layout and also click Expand widget Templates. Now, search for <data:post.body/>
Now if you want to put your reddit button on the top right then replace the above code with this one.
<div style='float:left; margin-right:10px;'>
<script type="text/javascript" src="http://www.reddit.com/button.js?t=2"></script>
</div>
<data:post.body/>
You can also keep the reddit button on the top right section by relacing the <data:post.body/> by the code given below.
<div style='float:right; margin-right:10px;'>
<script type="text/javascript" src="http://www.reddit.com/button.js?t=2"></script>
</div>
<data:post.body/>
You can keep experimenting with codes to keep it in some more parts of the blog. Anyway, if you liked this then i hope a comment from you.
I used to think if creating sticky post for blogger was that tough work. But thanks to eHow.com which helped me knowing that i was really an idiot to think such. Creating sticky post is really very very easy and its like adding a new page element ob blog. In fact, it is adding a new page element on blog.Sorry, oh you are asking about sticky post? Ok it is that post which always appears when your blog opens just above each post. Confusing? Well, that was the best definition i could give.
To create a sticky post, goto Page Elements section and then click on add a new page element. Now click on HTML/javascript and write what you need to announce or say. After you are done, save it and drag newly written HTML/Javascript item to the blog posts section. Now save and enjoy your sticky post.
If this post was good then read also Adding Digg Bottom in your post and Make your links tweak in blogger!
This is my second blogger hack on making things tweak in blogger. Before i wrote a post on making images tweak on blogger. Then i thought if i could try making links too Tweak when mouse is placed on it. I tried and i did it. Here is rest on how to make your links tweak in blogger.
Its same like making images tweak. Just editing a hover code and we are done. First, go to your Edit HTML section of your Layout and search for the following code:
a:hover {
text-decoration:underline;
}
Now replace the code with the code given below:
a:hover {
position: relative;
bottom: 5px;
left: 1px;
color:#000000;
}
Now save the template and look at your page, the links tweaked man.
You can change the color of your link to your desired color when it tweaks. Also you can set your own parameters for your tweaking image by editing top and left pixels.
If you got any problems the just leave the comment and i will catch you.
I hope you enjoyed this post the try other blogger hacks like Control number of posts displayed in label page and Remove newer post and older post link from your blog.
Blogger hack on removing the irritating "newer posts" and "older posts" link shown after the end of the post is what i am writing about. This blogger hack belongs to Annie of Blogger university and i am putting this blogger hack here as it may reach to the readers who don't know about her blog.
To remove "Newer posts" and "older post" is easy. It also removes "home" link from the buttom of the page. Firstly search this code in your blogs Edit HTML section:
#blog-pager-newer-link {
float: left;
}
#blog-pager-older-link {
float: right;
}
#blog-pager {
text-align: center;
}
Now replace that code with the following code:
#blog-pager-newer-link {
display: none;
}
#blog-pager-older-link {
display: none;
}
#blog-pager {
display: none;
}
Save the template and thank to Annie, you are done. By the help of this blogger hack, you will never see those links in your blog again.
If this hack was helpful then visit our collection of blogger hacks.
Time for another blogger hack guys. This time i am with the shortest blogger hack ever so i thought to make you bore with long description as it may help my post look longer. Anyway, i am not sure where i read this blogger hack so i have nobody to refer hence think as i discovered this blogger hack. This blogger hack is about hiding the unnecessary Subscribe to:Posts(atom)
Well, let me start with same old lines, goto Dashboard then to Layout and then to Edit HTMl and click on Expand widget templates. Now search for the following code:
<div class='blog-feeds'>
Now replace that line with the following line of code below:
<div class='blog-feeds' style='display:none;'>
Now save the template, reload the page and thank me! I think now you will not see that useless line anymore.
If this Blogger hack was useful then try Adding Digg button to your post or Adding Yahoo emotion on your Post!
Back again with a blogger hack and this time with a coolest thing. You can see 'Show Table of contents' section in my blog now where all my table of contents will be loaded with one click. You can try it just to see what table of content looks like if you haven't seen it earlier. Well before starting to write about this blogger hack, i want to remember Hans of beautifulbeta who created this blogger hack as far as i know. Well, i am deriving his codes and hacks but i am trying to write in a much simpler way then him. So here is the process to create a Table of contents in your blog.
Table of contents helps your readers to find your posts easily. Just add some codes and all your posts are one click away from your readers.
Goto blogger 'Edit HTMl' page and search for the code <b:section> with id=main. This is the section which held blog posts. Now replace that line with the following code.
<b:section class='main' id='main' maxwidgets='2' showaddelement='yes'>
Now add the following CSS code to the head section of your template. This code is for the style of your table of contents. You can change this code according to your choice. The best place to add this code is just above ]]></b:skin> I am saying this place now because i was really confused about at which place of the head section should i put this code when i was creating my own Table of contents.
<style type="text/css">
#toc {
border: 0px solid #000000;
background: #ffffff;
padding: 5px;
width:500px;
margin-top:10px;
}
.toc-header-col1, .toc-header-col2, .toc-header-col3 {
background: #ffd595;
color: #000000;
padding-left: 5px;
width:250px;
}
.toc-header-col2 {
width:75px;
}.toc-header-col3 {
width:125px;
}
.toc-header-col1 a:link, .toc-header-col1 a:visited, .toc-header-col2 a:link, .toc-header-col2 a:visited, .toc-header-col3 a:link, .toc-header-col3 a:visited {
font-size:80%;
text-decoration:none;
}
.toc-header-col1 a:hover, .toc-header-col2 a:hover, .toc-header-col3 a:hover {
font-size:80%;
text-decoration:underline;
}
.toc-entry-col1, .toc-entry-col2, .toc-entry-col3 {
padding-left: 5px;
font-size:70%;
}
</style>
Now you are done with 'edit HTML' page. Now save the template and go to 'page elements' section.
Now click on 'add a page element' and then click on 'HTML/Javascript'. Now paste the code there leaving title blank.
<div id="toc"></div>
Now do the final step. Again add a new page element and click on HTML/javascript. Now paste the code there and keep the title 'Table of contents'.
<div id="toclink"><a href="javascript:showToc();">Show TOC</a><br/><br/></div>
<script style="text/javascript" src="http://home.planet.nl/~hansoosting/downloads/blogtoc.js"></script>
<script src="http://YOURBLOG.blogspot.com/feeds/posts/default?alt=json-in-script&max-results=999&callback=loadtoc"></script>
Change YOURBLOG with your own name and congratulate yourself for making your own table of contents.
This was todays blogger hack on creating table of contents. You can also try other blogger hacks like Adding Yahoo! emotion on your blog post or making your images tweak on blogger.
Another blogger hack is here so i hope you are ready to welcome it with a drumroll. This tutorial is about creating float images that will always show on your blogs corner although you drag side scroll bar. See the example of floating image (The RSS image is used as floating image there). You can out anything on your blogs corner as your floating image, your dog, your own picture or anything. So here is the step by step tutorial on creating floating images on blog.
Step 1: Login to blogger dashboard then goto 'layout' and 'Edit HTML'
Search for ]]></b:skin> code and put the code below just above that code.
#float_corner {
position:fixed;_position:absolute;bottom:0px;left:0px;clip:
inherit;_top:expression(document.documentElement.scrollTop+document.documentElement.clientHeight-this.clientHeight);_left:expression(document.documentElement.scrollLeft + document.documentElement.clientWidth - offsetWidth);}
The bold text in the code is its position, you can keep it top or right or left anything as your choice.
Step 2: Now put the code below before </body> tag.
<div id="float_corner">
<a href="http://bloggingshits.blogspot.com"> <img src="
http://rabinsmith.googlepages.com/rss.png" border="0" /></a>
</div>
Here, "http://bloggingshits.blogspot.com/" is a link. And
"http://rabinsmith.googlepages.com/rss.png" is image url. You should change these with your own link and image url.
Now save and preview your blog. And if it worked then can i be blessed with a backlink to this post? Thank you so much, that was so kind of you.
If this blogger hack was helpful then you can try Adding Digg buttom to your posts!
This may be a blogger hack or may not be a blogger hack but since in my view all the stuffs that comes with some change in the HTML code is a blogger hack. So if someone has any problem with me calling this post a blogger hack then read my shitty definition and jump from London bridge. And who doesn't, read rest of the post!
Tweaking images add some glamor to your blog. If compared to the normal images, the tweaking images looks like the most beautiful SLUT( i couldn't find a better word, sorry!). And another good thing is it is so easy to make your images tweak in blogger. Just change some HTML codes and your images starts tweaking. Tweak-inkle tweak-inkle little pictures, all i wonder what you are........ sing by yourself! So if you seriously want tweaking images like mine then follow the following steps.
Step 1:
Goto 'Dashboard' and then to 'Layout' and then to 'Edit HTML'. Don't forget to click on 'Expand widget templates'. And yes, backup your template before use.
Step 2:
Search for the following code in your template:
.post img {
padding: 4px;
border: 0px solid $borderColor;
}
Step 3:
Now paste the following code just below the above code in your template.
.
.post img:hover {
position: relative;
top: 1px;
left: 1px;
}
Now save your template and its done. Now to check if you are done or not simply place your mouse cursor above any image and see whether it tweaks or not.
If you liked this blogger hack then try Show only post title at Label.
Time for another blogger hack. And this time its not about expandable sidebar or adding social bookmarking widget, its about your emotion. Yeah, we are dealing with adding Yahoo emotion on your blog post section. Yahoo emotion? Yes, its true. Can't post your own emotion so took a help from yahoo. So here's how we make this blogger hack happen.
Adding Yahoo emotion in your blog post section is really easy, as easy as . Its just a matter of few HTML and what you gotta do is follow the instructions below. Oh wait, i forgot first make sure that you are using Mozilla firefox as you cannot move a step ahead if you are not using it. Step 1
Install Greasemonkey which is an firefox add on on your browser. Click here to get greasemonkey. After you install restart your browser so that add on will work.
Step 2
Click this script and then click install.
Step 3
Now its about your HTML code. Goto 'Dashboard' then to 'layout' and then to 'Edit HTML'. Now same OLD boring line "Please backup your template so that you can use it afterwards if anything goes wrong".
Now search for this code: ]]></b:skin>
Step 4
Now copy the following code just above the code in step 3.
img.emoticon { padding: 0; margin: 0; border: 0; }
Step 5
save your template and Congratulations! You made it, wooo!
To check if you are done or not , goto blogger create post, you will see the emotion in the tools panel of the compose tabs as in image below. If this blogger hack was good then why don't you try Control number of pages displayed in Label and archive page?
Blogging hacks, this word has fascinated me so much lately that almost everyday i post a new hack. Its hard to collect hacks but feels really good when you guys like it. Comment is the thing that inspires me a lot and thank you guys, i have been getting some comments lately. Today,s blogger hack is pretty easy. We can control number of pages to be displayed on the Label pages from this hack. So read rest of the post to learn this blogger hack.
You may find it conjusted when there are lots of post displayed in your Label age. You may want to control it on your choice. So what are you gonna do? From this blogger hack you can easily control number of pages to be displayed on your label pages. You can keep it as your wish, 5,10 or whatever. So lets do it step by step.
Step 1:
Sorry, same old boring line again. Goto 'Layout' then to 'Edit HTMl' and don't forget to click on 'Expand widget templates'. Please don't forget to back your template up.
Step 2:
Search for this code:
data:label.url
Now replace the upper code with this code:
data:label.url + "?max-results=n"
Where, "n" is the number of post you want to display in your label page. Just replace "n" with your choice of number and save the template. Now check on label to see if this blogger hack have worked on you or not.
This was today's blogger hack and i will bring you lots of other cool blogger hacks soon. Till then you can check other blogger hacks like Show only Post Title at Labels and Archive page or How to hide borders from header and images?
You too may hate it like me but you have no idea how to remove it. I am talking about the full articles that comes in your label page. How would it be when your "Post title" is only shown except of full post in your label and archive page? Well, it will be great as your page will take less time to load and you will get another page view from your reader if they find your Post title attractive. So in today's blogger hack we are learning to show only post title at the Label and archive page.
Step 1:
Same old line, go to 'Layout' then to 'Edit HTML' and click on 'expand widget templates' checkbox. Now backup your template by clicking 'Download full template' so you can get your template back if anything goes wrong.
Step 2:
Search for the code below:<b:include data='post'name='post'/>
Step 3:
Replace the above code in step 2 with this code:<b:if cond='data:blog.homepageUrl!= data:blog.url'>
<b:if cond='data:blog.pageType != "item"'>
<h3 class='post-title'><a expr:href='data:post.url'><data:post.title/></a></h3>
<b:else/>
<b:include data='post' name='post'/>
</b:if><b:else/><b:include data='post' name='post'/>
</b:if>
Now save the template and you did it. This was real easy wasn't it? If you liked this hack then why don't you try to create a Drop down menu in your blog or Hide blog posts date,time and author.
There are lots more blogging hacks coming. So Subscribe me so that you will not miss any of the cool blogger hacks.
After talking about blogger hacks like how to create drop down menu and how to add Digg button on your post, in this series of blogger hacks we are talking about how to create Drop down labels. Drop down labels? Yeah, no kidding, i swear of Peter's mom that this blogger hack is going to be cool and really great to implement too.
This blogger hack is not that hard to implement. It is just the game of few codes and you are done. So lets go to the point on how to create Drop Down labels. Firstly go to 'Layout' then to 'Edit HTML' and click on the 'Expand widget template' checkbox. i am again repeating the same boring thing 'Please download your full template first'. Okay, so are we done till this step? Okay then let's move forward.
Now look for the following code in your template<b:widget id='Label1' locked='false' title='Labels' type='Label'>
<b:includable id='main'>
<b:if cond='data:title'>
<h2><data:title/></h2>
</b:if>
<div class='widget-content'>
<ul>
<b:loop values='data:labels' var='label'>
<li>
<b:if cond='data:blog.url == data:label.url'>
<data:label.name/>
<b:else/>
<a expr:href='data:label.url'><data:label.name/></a>
</b:if>
(<data:label.count/>)
</li>
</b:loop>
</ul>
<b:include name='quickedit'/>
</div>
</b:includable>
</b:widget>
Now, replace the code above in blue with following code.<br />
<select onchange='location=this.options[this.selectedIndex].value;'>
<option>Select a label</option>
<b:loop values='data:labels' var='label'>
<option expr:value='data:label.url'><data:label.name/>
(<data:label.count/>)
</option>
</b:loop>
</select>
Now save the template and you are done. Wow, you did it man.
This was todays blogger hack. If you will use this hack then i hope a free backlink from you.
Sometimes you feel so low that you don't like to write a post about new blogger hack nor you like to keep sticking on mybloglog to see your traffic stats. It's a time to explore something and guys i am out with my untied seatbelt to travel the wild blogosphere. While exploring the blogosphere i went through a personal cum technical wordpress blog of Hari and here i am writing about it.
A black background with orange post background color and white colored links is what Aspiring entrepreneur blog is made off. I don't know why he calls his blog Aspiring entrepreneur but forget that because till now i don't know why i am calling my blog Third world chaos. College, education, free downloads are some of the categories covered by this blog and that too in a cool way. This was todays post about Aspiring entrepreneur and if you love to read personal blog then you can go for this blog.
In this todays post, we are talking about creating drop down menu. For your idea, a drop down menu is the menu THAT DROPS DOWN! Oh, this was the worst definition you may have heard about drop down menu but what can i do? This is the best i can give. <select onChange="document.location.href=this.options[this.selectedIndex]. <select onChange="document.location.href=this.options[this.selectedIndex] <option value="Links 3">Text 3</option> If you want the links to be opened in new window then replace below code: <select onChange="document.location.href=this.options[this.selectedIndex]. <select onchange="javascript:window.open(this.options[this.selectedIndex].
It's not hard to create a drop down menu, its just a trick or lets say hack. What you gotta do is just copy the code given below and put it in your page elements.
<option value="0" selected>Blog Archive</option>
<option value="Links 1">Text 1</option>
<option value="Links 2">Text 2</option>
</select>
The Blue text you see their is your Anchor text. So change it with your anchor text too.
Time for an example:
This is the code i used to create the Drop down menu you can see in my sidebar.
<option value="0" selected>Blogger Hacks</option>
<option value="http://thirdworldchaos.blogspot.com/2008/05/blogger-hack-add-digg-button-to-your.html">Add
Digg button on your post</option>
<option value="http://thirdworldchaos.blogspot.com/2008/05/blogger-hack-dont-let-anybody-copy-your.html">Disable
Right click on your blog</option>
</select>
before this code </select>
With this code:
I am still unaware about the definition of blogger hack. In my sinple and innocent( he he) sense i think every thing related to the blogger codes may be called blogger hack. Was that wrong? Thank you smartass, leave your comment below about it then. Okay now lest go to the topic. today we are adding digg button on our post. And its easy to do that. Digg button on our post? Well, the button under my post title may help you.
This blogger hack(i said it, again) is not hard to implement. A digg button under your post in the way like my blog is just a few clicks away. So let's go step by step.
Step 1
I am making you bored again. Please download your full template so that you can have it like now. For that go to 'Dashboard' and then to 'Layout' and then to 'edit HTML'.
Step 2
Okay, i guess now you are on 'Edit HTML' section and have already backed your template up. Dont forget to click on 'Expand widget Templates' checkbox. Now search for this code
<p><data:post.body/></p>
If you want to put your botton on the top left like mine then replace the above code with this.
<div style='float:left; margin-right:10px;'>
<script type='text/javascript'>
digg_url="<data:post.url/>";
</script>
<script src='http://digg.com/tools/diggthis.js' type='text/javascript'/>
</div>
<p><data:post.body/></p>
But if you want to keep it at the top right corner of the page then replace with this code:
<div style='float:right; margin-left:10px;'>
<script type='text/javascript'>
digg_url="<data:post.url/>";
</script>
<script src='http://digg.com/tools/diggthis.js' type='text/javascript'/>
</div>
<p><data:post.body/></p>
You can keep experimenting with the codes to keep it on other parts of the blog too. If this post about Digg was good then please Digg me!
This blogger hack is useful, this blogger hack is cool and the best thing is this blogger hack is so easy to implement. Gentleman, welcome to the post dedicated on showing recent comments in sidebar.
Showing recent comments in sidebar is not a hard thing to do. Its just a game of code. So without delay i am onto game. To show recent5 comments on sidebar, you should copy the following codes in red and stick it in the template. After you save it, see your recent comments on sidebar.
<MainPage>
<h2 class="sidebar-title">Recent Comments</h2>
<ul>
<Blogger>
<BlogItemCommentsEnabled>
<BlogItemComments>
<li><$BlogCommentAuthor$> //
<a href="<$BlogCommentPermalinkURL$>">
<$BlogCommentDateTime$></a></li>
</BlogItemComments>
</BlogItemCommentsEnabled>
</Blogger>
</ul>
</MainPage>
If you are using this blogger hack then i hope i could get a link back to me.
So here is todays blohher hack. The usability or taste of using border depends on person. Personally, i don't like borders but as i said it depends on person and their taste. But this blogger hack post is just to make you know that it is so easy to remove borders in very short time. So you can use borders as long as you like and after you hate it, follow this post!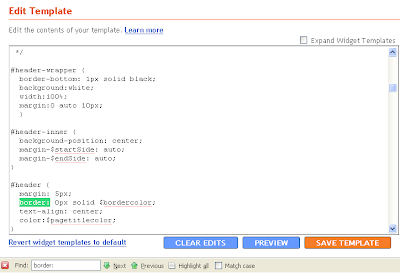 This may be the easiest blogger hack you find on this blog. To remove borders from header and images, go to 'Layout' and then to 'Edit HTMl'. From that search for the word "border" in the codes and delete it. You delete each and every "border" and you are done. The above image may help you in understanding this post more easily.
A question first. Do you love your content to a extent that you don't want anybody to copy it and paste it in their blog? Or are you strictly against plagiarism? If your answer is yes then this blogger hack is for you. This blogger hacks disable any right click on your content so that some newbie thief can't copy your content. Did i said newbie? Yes only newbie can be blocked from copying your content because professional thief will copy your content anyway.
Not many bloggers use this blogger hack to disable right click on their post content. I too havent done that as i am confident that nobody has faced such a bad day to copy this shit. He he. I am safe. Okay so lets cut the crap and go to blogger hack directly. What you gotta do to implement this is firstly goto 'Layout' and then click on 'Edit HTML'. Now find <body> code and replace it with the code given below.
<body onmousedown="return false" oncontextmenu="return false" onselectstart="return false">
Now save the template and you are done. Dont forget to see other blogger hacks too on the related posts.
I am not sure why people use this blogger hack. I have never used it after all who wants to hide their name as the author of the blog. But this blogger hack is really useful for the ones who want to keep their blog clean in fact very clean by removing all the post date, time and name of author. So if you too belong to the same category then this blogger hack is for you.
First thing first, go to 'layout' and then to 'Edit HTML'. Don't forget to check 'Expand widget templates'.
Hide Post date
To hide the post date, find the code below and delete it.
<data:post.dateHeader/>
Hide Post time
This blogger hack says, to hide post time find the code below and remove it, NOW!
<span class='post-timestamp'>
<b:if cond='data:top.showTimestamp'>
<data:top.timestampLabel/>
<b:if cond='data:post.url'>
<a class='timestamp-link' expr:href='data:post.url' rel='bookmark'
title='permanent link'><abbr class='published'
expr:title='data:post.timestampISO8601'><data:post.timestamp/></abbr></a>
</b:if>
</b:if>
</span>
Hide Post author
To hide the name of author, why don't you find code below and delete it.
<span class='post-author vcard'>
<b:if cond='data:top.showAuthor'>
<data:top.authorLabel/>
<span class='fn'><data:post.author/></span>
</b:if>
</span>
Congratulations, now your post is time, date and author free. Don't let it be readers free!
If you are thinking to use this blogger hack then can i get a linkback please!


 Subscribe by Email